Super Bomberman 3 (Super Famicom, 1995) — The Deep Guide: All 6 Worlds, All 5 Louies, the Items That Matter, and How to Win the 5-Player Battle Game
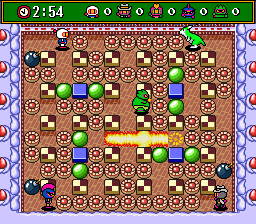
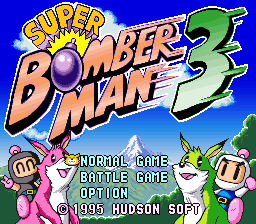
Every Bomberman is about corners: the corner you trap an enemy in, and the corner you get trapped in yourself. Super Bomberman 3, released for the Super Famicom on April 28, 1995, widened the maze in every direction at once. Its Normal Game sends White Bomberman and Black Bomberman across five planets to recover the scattered pieces of each planet's Mother Computer Chip, its Battle Game was the series' first to put five players on one screen, and it introduced the Louies — rideable, kangaroo-like partners whose colour decides whether you can dash, jump, or lay a whole line of bombs at once. This guide concentrates on the decisions the game actually asks of you: which world you are on and what its boss does, which Louie is worth keeping, which item panels are worth dying for (several are, because death takes them away), and how the Battle Game's options change who wins.
Quick Facts
| Item | Detail |
|---|---|
| Title | Super Bomberman 3 (スーパーボンバーマン3) |
| Platform | Super Famicom (Japan) / Super NES (PAL, Europe) — no North American SNES release |
| Release date | April 28, 1995 (Japan); October 15, 1995 (Europe) |
| Developer / Publisher | Hudson Soft (Japan) |
| Genre | Action / maze |
| Players | Normal Game: 1–2 (simultaneous co-op, shared stock of Bombermen); Battle Game: up to 5 (Super Multitap + second controller port), CPU opponents fill empty slots |
| Cartridge | 12-megabit ROM, HiROM mapping |
| Saving | None — progress is kept by 4-digit passwords shown on the Continue screen (the cartridge has no battery-backed RAM) |
| Headline additions | Louies (rideable partners, 5 types); 5-player Battle Game; Battle Game options (Sudden Death, Bad Bomber, Soccer Bomber) |
Overview
Professor Bagura — the alien who created the Five Dastardly Bombers — recovers his defeated creations from a junk heap, revives them, and sends each one to a planet of the Bomber Nebula. Each bomber seizes that planet's Mother Computer Chip, breaks it apart and scatters the pieces, powering the planet's network down. White Bomberman sets out to recover the chips planet by planet, and this time Black Bomberman fights alongside him: a second player can join the Normal Game at any time, although both players draw on one shared stock of lives.
A Normal Game area is cleared in a fixed rhythm. The chip pieces of the area are sealed inside control capsules (cores) placed around the maze; blast the soft blocks, destroy every capsule to collect the chips, clear out the enemies, and the way to the boss opens. Each of the five planets has four areas and then a boss stage, where that planet's Dastardly Bomber attacks in a large machine. Clear all five planets and the sixth stage — Bagura's Battleship, seven areas long — leads to Bagura himself.
The Battle Game is a separate, complete mode: up to five Bombers (any mix of humans and CPU) fight on one of twelve arenas as one of eight "World Bomber" characters, in free-for-all Single Matches or two-team Tag Matches, with optional rule twists covered in section 5 below.
Why It Still Matters
Three things in this 1995 cartridge became permanent parts of the series' identity. The Louies started here: an egg hidden in a soft block hatches a partner you ride, who takes a hit in your place and adds one colour-coded skill. The five-player battle started here too — Hudson's Super Multitap had existed since 1993, but this was the first Bomberman to use it together with the console's second port to seat five players at once. And the Battle Game's revenge and side-game ideas — the Bad Bomber system that lets a defeated player keep throwing bombs from the sideline, and Soccer Bomber, which awards the match winner an item through a penalty-shootout-style mini-game — gave losing players something to do and winners something to aim at beyond the round itself.
It is also the most openly "collect-the-set" of the Super Famicom entries: fixed item panels in fixed places, a password for every area, and a final stage that you are expected to enter fully equipped. Knowing where things are is most of the difficulty — which is exactly what the tables below are for.
Highlights
- Six worlds, one checklist each: five themed planets (four areas + boss apiece) and a seven-area Battleship finale — every area has a password, listed in the table below.
- Five Louies, five different games: the Brown Louie's line of bombs melts bosses; the Pink Louie's jump is an escape button; the Yellow Louie turns soft blocks into weapons in the Battle Game.
- Items are positional, not random: the Normal Game's panels are pre-placed, the essential Remote Control first appears in area 2-3, and cleared areas can be revisited to stock up — but only until you beat the fifth boss.
- A Battle Game built for a crowd: 5 players, 12 arenas (2 of them hidden), 8 World Bombers, CPU difficulty that a password can push to level 4, and a Skull panel whose random curses can be handed to an opponent by touching them.
Strategy Essentials
1. The Normal Game — All Six Worlds, Bosses and Area Passwords
Enter a 4-digit password at the title screen's Password option to resume at that area. Passwords do not preserve your items — a resumed game starts with basic equipment, which is why section 4's stocking-up route matters.
| Stage | Planet | Theme | Boss (Dastardly Bomber) | Area passwords |
|---|---|---|---|---|
| 1 | Swamp Attack | Jungle / swamp planet | Magnet Bomber | 1-1: 5358 · 1-2: 9486 · 1-3: 4332 · 1-4: 3306 · Boss: 2280 |
| 2 | Firestorm | Volcanic planet, pillars of flame | Golem Bomber * | 2-1: 6408 · 2-2: 5862 · 2-3: 4836 · 2-4: 7938 · Boss: 6912 |
| 3 | Deep Sea | Ocean planet | Pretty Bomber | 3-1: 9438 · 3-2: 8412 · 3-3: 7386 · 3-4: 5880 · Boss: 4854 |
| 4 | Pyramid | Desert planet | Brain Bomber | 4-1: 8916 · 4-2: 7890 · 4-3: 5360 · 4-4: 3309 · Boss: 6411 |
| 5 | Winterland | Snow / ice planet | Plasma Bomber | 5-1: 5865 · 5-2: 8967 · 5-3: 2787 · 5-4: 9473 · Boss: 2301 |
| 6 | Battleship | Bagura's battleship — 7 areas, then the final boss | Professor Bagura | Final stage: 6363 |
The European manual calls the Stage 2 boss Fire Bomber. Some English-language guides call the same character Golem Bomber.
How the campaign flows, and where it bites:
- The clear condition never changes: find and destroy every control capsule in the area to recover its chip pieces. If you have "cleared" all the enemies and nothing opens, a capsule is still hidden in an unblasted soft block.
- Bosses are machines, not duels. Each Dastardly Bomber fights from a large vehicle. Your job is positioning: plant bombs where the machine's route must pass, keep an escape lane open, and let chain reactions work. The Brown Louie (section 2) and the Remote Control (section 3) are the two biggest boss shortcuts in the game.
- Stage 6 is a point of no return in two ways. Entering it ends your access to the earlier planets, and its seven areas are long. Read section 4 before you beat the Stage 5 boss.
- Two stage gimmicks destroy items. In areas 2-3 and 2-4 a train crosses the stage: if you ride it over soft blocks, any panel hidden inside is lost. In Stage 6, enemy helicopters fire missiles that destroy soft blocks the same way. When you are farming a specific panel (the Remote Control sits in 2-3), clear the blocks yourself, by hand, first.
2. The Five Louies — Abilities and When Each One Wins
Eggs are hidden in soft blocks in both the Normal and Battle Games. Walk over an egg and the Louie hatches already ridden; the colour is random. Press Y to use its skill. A Louie also works as a shield: a blast or enemy touch that would kill Bomberman costs the Louie instead. Two trade-offs apply to all five: you cannot use the Power Glove while riding, and stepping on a second egg while already riding does nothing.
| Louie | Skill (Y button) | Best use | Watch out for |
|---|---|---|---|
| Green | Dash — runs in a straight line at high speed until it hits an obstacle; you can plant bombs while dashing | Crossing a long, clear lane; laying a bomb trail across a boss arena | It only stops at an obstacle (with Block Pass, only at the arena edge) — a dash that meets an enemy or a fresh blast line is a death. The riskiest Louie |
| Pink | Jump — leaps over exactly one block, a bomb, or even a blast line if timed | The universal escape button: hop out of a trap, over ice-stage hazards, or over a block into safety | Only one block deep — useless against a two-block wall of trouble |
| Blue | Bomb kick (arc) — kicks a bomb in an arc over blocks, like the Power Glove's throw | Attacking over walls before you own a Glove; dropping bombs into a boss's lane from safety | Redundant once you have the Glove — and you give up the Glove while riding any Louie |
| Brown | Line Bomb — lays a line of bombs in the direction faced, as many as your current bomb stock | The boss killer. A full line detonating together is the largest damage spike available in the Normal Game | A full line can also box you in. Face a lane you can leave, and count your stock before you press Y |
| Yellow | Soft-block kick — kicks one soft block, which slides until it hits a player, wall or bomb (and can set a stationary soft block sliding in turn) | A Battle Game specialist: slide blocks to seal an opponent's escape or crush their position | Little value in the Normal Game beyond the free hit it absorbs |
Choosing between them: in the Normal Game, Brown > Pink > Blue > Yellow > Green is the practical order for most players — damage, escape, utility, then the two situational colours. In the Battle Game the Yellow Louie climbs sharply, because moving the maze itself is a weapon against humans.
3. Item Panels — What Matters, What Death Takes Away
Panels hide inside soft blocks. In the Normal Game their positions are fixed per area, so a farming route is reliable (section 4). The stat panels (Bomb Up, Fire Up, Speed Up) and score items are kept when you die; the equipment panels marked ◆ below are lost when you are killed — protecting them is the Normal Game's real difficulty curve.
| Panel | Effect | Where it matters most |
|---|---|---|
| Bomb Up | +1 bomb you can plant at once (stacks) | Everywhere — and it directly multiplies the Brown Louie's line |
| Fire Up | +1 tile of blast range (stacks) | Everywhere; long lanes on the Battleship |
| Speed Up (Skate) | +1 movement speed (stacks) | Take them greedily early; very high speed makes fine positioning twitchy, so stop when control suffers |
| Full Fire / Power Bomb | Your first bomb explodes at the maximum 8-tile range (Power Bomb is the Battle Game's version of this idea) | Opener pressure in battle; capsule hunting in the Normal Game |
| ◆ Remote Control | Detonate your bombs with the B button, on your timing | The single most important panel in the Normal Game. First found in area 2-3; also in 3-3 and Stage 6. Picking up a Slime, Pierce or Power bomb type afterwards replaces it — think before you swap |
| ◆ Pierce Bomb (Spike Bomb) | Blasts pass through soft blocks instead of stopping | Mass-clearing blocks and capsule hunting; first appears in 2-3, the same area as the Remote — you cannot keep both bomb types, so choose per area |
| ◆ Rubber / Slime Bomb | Thrown or kicked bombs bounce unpredictably | Chaos tool: dangerous to everyone including you; a Battle Game toy, a Normal Game liability |
| ◆ Bomb Kick | Walk into a bomb to slide it along the floor; X stops it | Trapping enemies and opponents; note Bomb Pass (below) overrides Kick and vice versa — the later pickup wins |
| ◆ Power Glove | Pick up a planted bomb (A) and throw it in an arc over blocks | Attack and defence in one: a thrown bomb bounces off you harmlessly if you are holding one. Unavailable while riding a Louie |
| ◆ Bomb Pass | Walk through your own bombs | The anti-self-trap panel for the Normal Game |
| ◆ Block Pass | Walk through soft blocks | Rated essential for the final stage by long-standing guides: it turns the maze's own walls into your escape routes |
| ◆ Heart | Absorb one extra hit | Only one can be held; also the prize everyone wants from Soccer Bomber |
| Invincible Suit | Invincibility for a short time (16 seconds) | Spend it attacking, not retreating |
| Clock | Freezes time and all enemies for a short time (16 seconds) | Extremely rare — a free capsule-clearing window |
| Egg | Hatches a Louie (see section 2) | Take it even for a colour you dislike: the free hit is the point |
| Skull (Battle only) | A random curse: e.g. maximum speed, crawling speed, reversed controls, bombs that plant themselves as you walk, minimum-range bombs, no bombs at all, teleport swap with an opponent… | It cannot be destroyed — a blast just bounces it elsewhere. Get rid of it by picking up another panel or by touching another player to pass it on |
| Geta (clog) | −1 movement speed. A trap panel | Do not pick it up; blast it where it lies. It also appears as an unwanted Soccer Bomber prize |
4. The Endgame Problem — Stock Up Before Stage 6
The Normal Game's structure quietly sets a trap. Cleared areas can be revisited freely to re-collect their fixed panels — until you defeat the Stage 5 boss, after which you go straight to the Battleship and cannot return. Entering Stage 6 under-equipped is the campaign's classic failure, and the "Final Stage: 6363" password makes it worse, because passwords restore position, not equipment.
The veteran solution, in order:
- Do not use 6363. If you want a password start near the end, use 2301 (the Stage 5 boss) and farm before the fight.
- Farm the generous early areas. Area 1-1 alone holds Bomb ×2, Fire ×2, Egg ×2 and a Speed Up, and can be replayed; 1-4 adds Bomb Pass, a Heart, an Invincible Suit and a 1-Up. Repeat 1-1 for Speed Ups until movement feels right.
- Collect the two essentials: the Remote Control (2-3 or 3-3) and Block Pass (3-3) — plus Bomb Pass, a Glove, a Heart, and a Brown Louie if an egg cooperates.
- Then beat the Stage 5 boss and enter the Battleship full. In Stage 6, guard the Remote and Block Pass with your life: both are lost on death, and the stage is balanced assuming you kept them.
In two-player co-op this matters twice over, because the shared stock means one player's careless death spends both players' margin.
5. The Battle Game — Rules, Arenas and How to Win
Format. Up to five players; empty seats are filled by CPU Bombers (four difficulty levels — see the password table). Choose one of eight World Bombers — Bomberman (Japan), Bomber Kid (USA), Metal Bomber (England), Pretty Bomber (France), Bomber Uhho (Kenya), Bomber Chun (China), Bomber Cossack (Russia), Mexican Bomber (Mexico) — then a Single Match (last Bomber standing) or a Tag Match (two teams). A match is a set of rounds on one chosen arena; the stage can only be changed once someone has won a match on it.
Rule options worth understanding:
| Option | What it does | Strategic effect |
|---|---|---|
| Sudden Death | When time runs low, the arena closes in / pressure ends the round decisively | Punishes pure survival play — build a killing position early |
| Bad Bomber | A defeated player returns at the arena's edge as a sideline Bomber who can throw bombs into the field; tagging the winner with one earns a way back in | Nobody is ever just watching: stay away from the edges late in a round, and if you are the Bad Bomber, hunt the round leader |
| Soccer Bomber | After the match, the winner plays a soccer shoot-out mini-game to win a bonus panel (Bomb, Skate, Glove, Heart, Kick — or the booby prize, a Geta) | The Heart is the prize to track with your eyes: an extra hit carried into the next match |
The twelve arenas. Ten are available from the start; stages 11 and 12 are hidden (see the password table).
| # | Arena | # | Arena |
|---|---|---|---|
| 1 | Blockbuster | 7 | Sandman |
| 2 | Merry-Go-Round | 8 | Spitfire |
| 3 | Splish-Splash | 9 | Seesaw |
| 4 | Peekaboo | 10 | Jungle Boogie (listed as "Swamp Boogie" in the European manual) |
| 5 | Slip N' Slide | 11 | Superstar (hidden) |
| 6 | Move N' Groove | 12 | Happy Happy (hidden) |
System passwords (entered like stage passwords):
| Password | Effect |
|---|---|
| 4622 / 1616 / 3194 | Battle Groups 2 / 3 / 4 — swaps the selectable arena set to a different group (note: using a group password re-locks hidden stages 11–12) |
| 1511 | Unlocks CPU difficulty level 4 in the Battle Game |
| 5656 | Golden Bomber — the winner of a Single Match turns gold for the next round |
| 6514 | Hard Mode for the Normal Game (enemies have more HP; the game must be started from the beginning — individual areas cannot be password-entered) |
| Title screen: press X repeatedly for several seconds until a sound plays | Unlocks Battle Stages 11 and 12 |
Winning habits that do not depend on the arena:
- First ten seconds are farming, not fighting. Blast your local soft blocks, take the Bomb/Fire/Speed panels, then engage. Most early deaths are two under-equipped Bombers meeting in a corridor neither can leave.
- A kicked bomb is a sentence, not a suggestion. If you own Kick, push bombs along lanes opponents must cross, and stop them with X exactly at junctions.
- Respect the Skull economy. A Skull passed hand-to-hand is a countdown on someone. If it lands on you, your first job is a clean touch on another player or the nearest panel — not a kill.
- Play the edges when Bad Bomber is on. Every sideline bomb comes from the rim. Late-round duels belong in the centre.
- Keep your Louie. An egg in battle is an extra life wearing a costume; the Yellow Louie's block-kick additionally lets you rebuild the maze around a trapped opponent.
Who It's For
- Couch-multiplayer groups with a Multitap (or five controllers' worth of friends). This is the five-player Bomberman on the system, and the Battle Game alone justifies the cartridge.
- Completionist solo players. Fixed panels, a password for every area, a Hard Mode, and an endgame that rewards preparation over reflexes.
- Series historians. Louies, five-player battles, Bad Bomber and Soccer Bomber all start here; later games refine ideas this one introduced.
- Co-op pairs. The Normal Game's two-player simultaneous play with a shared stock is a genuine partnership mode, not a tag-along.
How to Play It Today
- Original cartridge. The Super Famicom original is Japanese-language but almost entirely icon- and number-driven; passwords are digits, and this guide's tables map every area. The European PAL SNES version is the English-language alternative (note the two naming differences flagged above: the Stage 2 boss and Battle Stage 10). Second-hand copies are the standard route:
- Modern collection. The game was reissued as part of the Super Bomberman Collection (2026), the most convenient current way to play it on modern hardware — check the collection's platform list for your system.
- About other versions. This guide covers the Super Famicom / PAL SNES game only. The Normal Game's structure resembles the earlier PC Engine title Bomberman '94, and the later Super Famicom sequels reuse the Louies with different details — none of their numbers or layouts are used here.
Find the original Japanese cartridge
Disclosure: The Rakuten and Yahoo! Shopping links are standard shopping links. Enkeisha does not earn a commission from purchases made through these links.
Find original hardware editions on eBay
As an eBay Partner Network affiliate, Enkeisha may earn a commission from qualifying purchases made through these links.
Search eBay listings (affiliate link)
Check the language, region, hardware compatibility, condition and authenticity before buying. Search results may include reproductions; links do not endorse individual sellers.