Front Mission (Super Famicom) — The Tactical RPG That Built Its Mechs From Spare Parts
Most tactical RPGs hand you a hero and a sword. Front Mission hands you a shopping list, a weight limit, and a walking tank that stops being a tank the moment its body — not its arms, not its legs — is shot out from under it. Released only in Japan for the Super Famicom in 1995, it remains one of the most systems-dense games on the platform, and the strategy section below is deliberately the longest part of this article: in this game, the shop screen is the battlefield, one turn early.
Scope of this article: This article covers the original Super Famicom version only. The later Front Mission 1st (PlayStation, 2003) and its Nintendo DS port (2007) add a second USN campaign, additional characters and scenarios, and various system changes. None of that later material is mixed into the facts, tables, or advice below — if a detail here differs from what you remember from the DS version, the DS version is the reason.
Quick Facts
| Item | Detail |
|---|---|
| Original title | フロントミッション (Front Mission) |
| English title | Front Mission (no official English release on Super Famicom; Japan-only) |
| Platform | Super Famicom (SFC) |
| Release date | February 24, 1995 (Japan) |
| Developer | G-Craft |
| Publisher | Square |
| Genre | Tactical role-playing game (simulation RPG) |
| Producers | Toshiro Tsuchida, Shinji Hashimoto |
| Character design | Yoshitaka Amano |
| Music | Yoko Shimomura, Noriko Matsueda |
| Cartridge | 24 Mbit (3 MB), HiROM / FastROM, battery-backed save RAM (64 Kbit) of this article |
| Setting | Huffman Island, 2090 — the Oceania Cooperative Union (OCU) vs. the United States of the New Continent (USN) |
Overview
Front Mission is set in 2090 on Huffman Island, a fictional Pacific island divided between two superpowers: the OCU in the east and the USN in the west. You play as Royd Clive, an OCU wanzer pilot whose reconnaissance mission to a munitions factory in the Larcus district ends in an ambush, an explosion, and a political incident — the Larcus Incident — that reignites war between the two blocs. Discharged and presumed dead, Royd resurfaces a year later earning money in wanzer arena fights, and is recruited into the Canyon Crows, a mercenary unit whose contracts carry the campaign across the island.
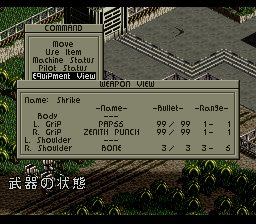
"Wanzer" is the game's central word, derived from the German Wanderpanzer — "walking tank." A wanzer is not a single unit with a single health bar. It is a frame of four separately tracked parts — body, left arm, right arm, and legs — each with its own HP, and each bought, swapped, and upgraded individually in town shops between missions. Lose an arm and you lose the weapon it was holding. Lose the legs and your movement collapses. Lose the body and the wanzer is gone entirely, whatever shape the rest was in.
Progression is linear in structure but open in preparation: watch the story events, take the briefing, spend as long as you like in the town's shop and setup screens and its arena, then sortie. Enemy forces are not just wanzers — you will also fight vehicles, aircraft, and large mobile weapons that typically field a single, heavily armoured body part instead of a modular frame.
Why It Still Matters
Front Mission arrived at a moment when the Super Famicom tactical RPG was dominated by fantasy. Against that backdrop it offered something noticeably adult: a near-future military conflict with mercenaries, arms manufacturers, propaganda, and a conspiracy — the experimental "B-device" programme — that the story treats as a war crime rather than a power-up. It sold strongly in Japan and launched a long-running series, but the original cartridge never received an official Western release, which is why so many players outside Japan first met this story through the later, expanded DS version instead.
It also matters mechanically. The part-based damage model and the weight-versus-power construction puzzle were not decoration; they defined the series from this first entry onward. Modern mech-customisation games still run on the same basic bargain this game struck in 1995: every weapon you want has to be carried, and carrying it costs you something somewhere else.
Finally, it is a notable Square production of its era: created by Toshiro Tsuchida's G-Craft, produced with Shinji Hashimoto, with character design by Yoshitaka Amano and a joint score by Yoko Shimomura and Noriko Matsueda — a fantasy-RPG dream team deliberately pointed at a war story.
Highlights
- A body is a life bar; everything else is a trade. Part-targeted damage means fights are about disarming as much as destroying. Blowing off a missile arm can neutralise a threat faster — and more cheaply — than grinding through its body HP.
- The intermission is a game in itself. Shops differ by town, stock rotates as you advance, and a full re-fit of a growing squad (new recruits keep arriving) is a genuine budgeting exercise, not a formality.
- Three experience tracks per pilot. Every pilot grows separate Fight, Short, and Long experience depending on what they actually fire, so your roster specialises organically — the pilot you fed machine guns becomes your machine-gunner, skills included.
- The Arena never closes. Optional one-on-one arena (Colosseum) fights in town are a permanent pressure valve for money and experience, and the game introduces them through the story itself: arena fighting is literally Royd's day job when the plot finds him.
Strategy Essentials
This is the section to bookmark. Front Mission is won in the setup screen and confirmed on the map.
1. The frame: four parts, four jobs
| Part | Role | If destroyed |
|---|---|---|
| Body | Houses the engine. Its Power output is your total weight budget for the whole machine, and its HP is your survival | Wanzer is destroyed and removed from play, however healthy the other parts were |
| Left arm / Right arm | Each arm holds one hand weapon (and can mount a shoulder weapon); arm accuracy ratings modify the weapons they carry | That side's weapons can no longer be used |
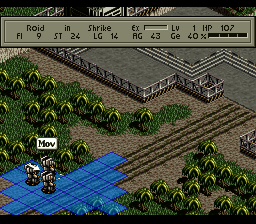
| Legs | Determine movement range (Move) and evasion; carry the machine across terrain | Movement collapses to a crawl (a single space per turn in the original's terms) — the wanzer can fight, but it cannot reposition |
The governing equation of the whole game fits in one line:
        Total weight of body + arms + legs + weapons
        + computer + backpack  ≤  Body's Power output
                         │
              Over the limit? The wanzer
              cannot sortie until you shed weight
              or fit a stronger body / booster backpack.
Practical reading of that equation:
- Upgrade the body first when a build stalls. A new body raises both your HP ceiling and your Power budget at once. A stronger weapon on an under-powered frame is a purchase you cannot field.
- Arms are accuracy, not just holders. When two arms cost the same, prefer the one whose accuracy suits the weapon class the pilot actually uses — a missile specialist and a brawler want different arms.
- Legs are a tempo purchase. Move and evasion decide who chooses the range of an engagement. Slow legs on a short-range pilot means arriving after the fight has moved on.
2. Legs and terrain (Super Famicom original)
A clarification that saves a lot of confusion: in the Super Famicom original, the legs sold for player wanzers are bipedal frames. Tracks, hover units, and four-legged movement belong to vehicles, enemy mobile weapons, and later entries in the series — you do not shop for them here, and advice written for later games about swapping leg types does not apply to this cartridge. What you choose between is bipedal legs of different weight classes, and the trade is always the same three numbers: Move, HP, and weight (with evasion moving alongside them).
| Leg class (shop progression) | Move | Durability | Weight | Best used for |
|---|---|---|---|---|
| Light bipedal | Highest | Lowest | Lightest | Short-range and melee pilots who must close distance every turn |
| Standard bipedal | Balanced | Balanced | Medium | Default fit for most of the squad; the safe first upgrade |
| Heavy bipedal | Lowest | Highest | Heaviest | Long-range and support pilots who park, fire, and rarely chase |
Terrain then taxes whatever Move you bought:
Terrain        Movement feel                    Practical note
-------------  -------------------------------  ------------------------------
Road / plain   Full Move                        Your planning baseline
City / ruins   Near-full, lots of hard cover    Fight street-to-street;
                                                ranges stay short
Forest         Extra movement cost              Eats light legs' advantage;
                                                expect ambush range fights
Mountain /     Highest movement cost            Route around with all but
high ground                                     your fastest units
Shallow water  Costly to cross                  Cross at the narrow point,
/ river                                         never end a turn mid-river
               if you can avoid it
Two rules follow. First, plan movement from the worst tile on the route, not the average — a pilot who arrives one turn late to a firing line usually arrives to a corpse or a rout. Second, protect damaged legs: because destroyed legs reduce a wanzer to a crawl, a leg-focused enemy (or a lucky spread of machine-gun hits) can strand a unit in the open. A repair item spent on legs, mid-map, is often worth more than the same item spent on an arm.
3. Weapons: three experience classes
Every attack a pilot makes trains exactly one of three experience tracks — Fight, Short, or Long — and the pilot's level in that track drives both damage growth and skill access (see §4). Build pilots around a track; generalists grow slowly in all three and master none.
| Class | Representative weapons | Range behaviour | Character |
|---|---|---|---|
| Fight (melee) | Tonfas, rods, knuckle/punch-type arm weapons | Adjacent only (range 1) | Single heavy blows that tend to strike the body — the fastest route to an outright kill, and the riskiest, because melee attacks strike second in an exchange unless the First skill intervenes |
| Short | Machine guns, shotguns, rifles, flamethrowers | Range 1 (point-blank) | Machine guns and shotguns spread multiple hits across several parts — ideal for stripping arms and legs; rifles and flamethrowers trade spread for one powerful shot |
| Long | Bazookas and grenade launchers (hand weapons used at distance); missile/rocket launchers (shoulder weapons) | Fires over several spaces; shoulder launchers have a minimum range as well | Long weapons let you hit without eating a full counterattack; missile launchers are support fire — they cannot be counterattacked — but carry limited ammunition, so every salvo is a budget decision |
Supporting notes:
- Shields can be carried in a hand slot. On a melee pilot who expects to be shot at while closing, a shield is often worth more than a second weapon — until the Double skill (§4) makes two melee weapons pay.
- Match the pilot to the spread. Give multi-hit Short weapons to pilots you want to cripple specific enemies; give body-seeking Fight weapons to pilots you want to finish them.
- Count missiles before you sortie. A missiler who runs dry mid-mission becomes a spectator with expensive legs. Restock at the supply truck / in town, and treat launcher ammunition as a recurring cost in your budget (§6), not a one-off purchase.
4. Skills: what repeated fighting teaches
As pilots gain experience in a track and level up, they can be offered a skill from that track. Skills have levels (1–3 in normal play; guides also reference a further "Last" tier) that raise how reliably or how strongly they trigger. Each pilot can only hold a limited number, so choose for the role the pilot is actually playing.
| Track | Skill | Effect |
|---|---|---|
| Fight | First | Your melee attack goes first in the exchange — removes melee's structural disadvantage |
| Fight | Double | With a Fight weapon in both hands, attack again with the second weapon; can chain into further attacks |
| Fight | Stun | Chance to stun the target, costing it its actions for a time (the effect a Flash item imitates) |
| Short | Duel | Aim your attack at a specific part (body / arm / legs) instead of a random spread |
| Short | Speed | Machine guns only: adds extra hits to the burst — more damage and more part coverage |
| Short | Switch | With two Short weapons equipped, follow up with the other weapon — Double's gunner equivalent |
| Long | Guide | For missile users: aim at a specific part — the single most valuable skill for a dedicated missiler |
How to farm them honestly: skills follow usage. A pilot parked on rifles will never see Double. Decide each pilot's track in the first few missions, equip accordingly, and let the arena (§5) supply extra repetitions between story missions rather than re-fighting story content. Duel and Guide deserve emphasis: part-aiming converts this game's damage model from luck into surgery — an aimed body shot ends fights, and an aimed shot at a launcher arm ends arguments.
5. Computers and backpacks: the quiet multipliers
| Slot | What it does | How to choose |
|---|---|---|
| Computer | Modifies the pilot's effective performance by percentage across four axes: Fight, Short, Long, and Agility (evasion) | Fit the computer to the pilot's track. A computer that boosts Long while taxing Short is a bargain on a missiler and a trap on a gunner. "Most expensive" is not "best for this pilot" — read all four axes before buying |
| Backpack | Adds item slots and, on many models, bonus Power output that raises your weight budget | Two distinct jobs: item-carrying packs turn a wanzer into a field medic/ammo mule; output-boosting packs are how overweight builds become legal. Decide which job each pilot needs |
Items are not optional garnish. Standard practice that the game quietly expects:
- Every front-line wanzer carries a repair item. Field repairs from a backpack — including repairs applied to an adjacent ally — are how a damaged squad finishes a long mission instead of retreating.
- A Flash-type item is a pocket Stun skill for pilots who never learned Stun; keep one on a gunner for emergencies.
- Reloads belong on the missiler, not spread evenly. One dry launcher is a crisis; one stocked launcher is a strategy.
- About a quarter of the way into the campaign you gain access to a supply truck that holds your shared inventory; a wanzer standing next to it can swap and replenish items mid-mission. Park your logistics thinking around it on long maps.
6. Campaign flow, the Arena, and where runs stall
The campaign is a single OCU-side storyline (the second, USN-side campaign exists only in the later 1st versions — not on this cartridge). Walkthroughs number the story battles into the high twenties before a separately labelled Final Mission, and published counts differ depending on how individual story battles are tallied — so the table below follows the campaign's phases and places, which every source agrees on, rather than a disputed total.
| Phase | Route / places (in order) | What changes for the player |
|---|---|---|
| 1. The Incident | Larcus district factory reconnaissance (Mission 1) | Scripted opening: Royd's team, the ambush, and the explosion that starts the war |
| 2. The mercenary | Barinden — arena introduction; the Canyon Crows form | First free shopping and your first real builds; Olson funds your initial upgrades |
| 3. First contracts | New Milgan → Menasa (supply escort) → Grey Rock | Roster grows; escort objectives teach you that not every mission is "destroy all" |
| 4. The liberation push | Freedom City and the drive west | Mid-tier shops; enemy quality steps up; part-aiming skills start deciding fights |
| 5. The fortress line | Peseta → Beltchka → OCU Frontbase → Fort Monus | The B-device conspiracy surfaces in earnest; boss-class mobile weapons appear |
| 6. Ceasefire jobs | Front Infirmary → Soleit → Carrier Camp | Working under the peace organisation; the Spirit of Huffman storyline; the squad eventually splits over what it learns |
| 7. Endgame | Rupidis → the facility on Longrivers Island → Final Mission | Full-price endgame shops; bring a settled roster — there is no time left to raise replacements |
The Arena (Colosseum). Available in towns, the arena offers optional one-on-one wanzer duels for Huffman Dollars (the game's currency, earned from mission rewards and arena wins alike). Treat it as three things at once: your money farm when a shop tier outruns your mission income, your experience farm for steering a pilot toward a specific skill, and your build-testing lab — a duel tells you in two minutes whether a new frame actually works.
Where runs stall, and the money discipline that prevents it:
- The destroyed-body bill. Broken arms and legs are a between-missions inconvenience; a wanzer whose body was destroyed is the expensive failure. It is almost always cheaper to retreat a body-damaged wanzer behind the line and repair it than to buy your way out of a total loss.
- Over-buying for the whole roster. New recruits arrive steadily, and fully re-fitting every arrival bankrupts you. Keep a core squad at current-tier equipment; give recruits the hand-me-downs; promote them only when a mission slot demands it.
- Under-buying legs and bodies. Players splurge on weapons and wonder why nothing connects. Accuracy lives in arms and computers; survival and budgets live in bodies and legs. Spend in that order: frame first, firepower second.
- Missile debt. Launcher ammunition is a subscription, not a purchase. If your budget cannot feed a second missiler, field one missiler properly instead of two who go dry together.
- Early-game shape. A reliable opening formation: Royd and one other pilot on Short weapons (machine gun for spread, rifle for punch), one dedicated Fight pilot closing behind them, and one Long pilot hanging back with the launchers. That shape teaches all three experience tracks from Mission 2 onward, which is exactly when the teaching is cheapest.
Who It's For
- Tactical RPG players who enjoy the preparation layer — building, budgeting, testing — as much as the battles themselves.
- Mech fans who prefer grounded, near-future hardware logic (weight, power, ammunition) to super-robot spectacle.
- Series newcomers who want the original, unexpanded storyline exactly as 1995 players got it — with the understanding that the DS version's extra campaign is a different edition, not this one.
- Japanese-reading players, or patient players comfortable navigating menus by structure: the cartridge is Japanese-only, so menu literacy matters more here than in most imports.
How to Play It Today
- Original Super Famicom cartridge: The authentic route covered by this article. It is a Japan-only release with Japanese text throughout; second-hand copies circulate through Japanese retro retailers and marketplaces.
- Later official editions (different versions — see the scope note): Front Mission 1st for PlayStation (2003, Japan) added the USN campaign; the Nintendo DS port (2007) brought that expanded edition to North America in English; Front Mission 1st: Remake (2022 onward) modernised it again for current platforms. These are legitimate ways to experience the story, but their added scenarios, characters, and balance are not the Super Famicom original this article describes.
- Whichever route you choose, budget your first session generously: the opening hour teaches factory, fall, and arena in sequence, and the game only opens its real build depth once the Canyon Crows form.
Find the original Japanese cartridge
Disclosure: The Rakuten and Yahoo! Shopping links are standard shopping links. Enkeisha does not earn a commission from purchases made through these links.
Find original hardware editions on eBay
As an eBay Partner Network affiliate, Enkeisha may earn a commission from qualifying purchases made through these links.
Search eBay listings (affiliate link)
Check the language, region, hardware compatibility, condition and authenticity before buying. Search results may include reproductions; links do not endorse individual sellers.